Charities is where you build and maintain a master list of all the organizations you support. Having a saved list makes it much faster and easier to enter donations—you just pick from your list instead of typing the charity name each time.
What You’ll See
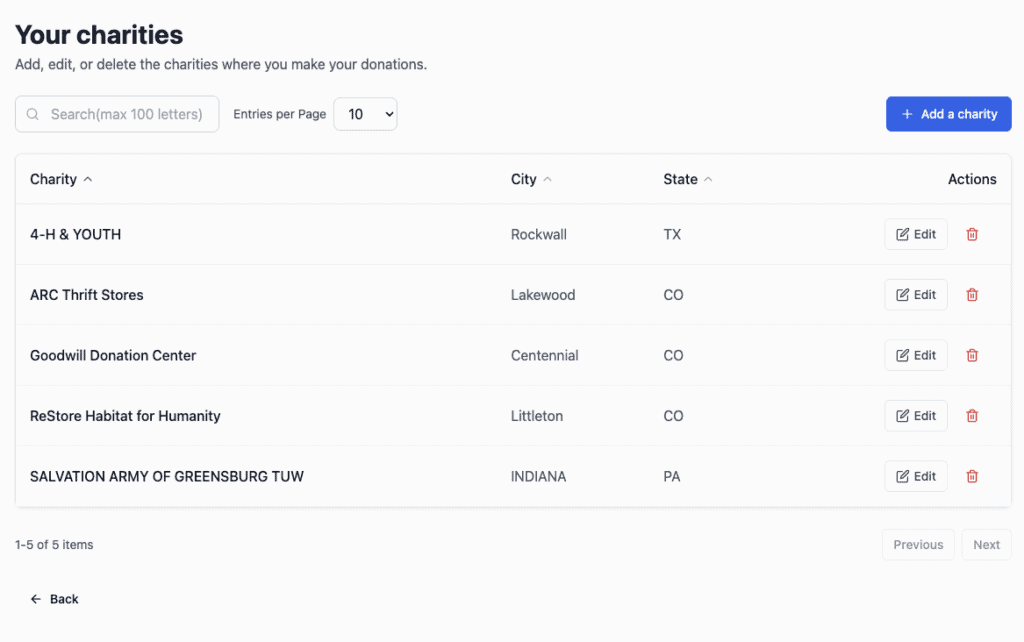
When you click View next to Charities on the Dashboard, you will see:
- A search box – Find charities by name
- Column headers – Sort by Charity Name, City, or State
- List of charities – Each row shows one organization
- Count indicator – Shows how many charities you have saved (example: “8 charities”)
- Edit/Delete buttons – Modify or remove charities
- Pagination – Navigate through pages if you have many charities
Understanding the Columns
Charity Name
The official name of the organization.
Examples:
- American Red Cross
- Salvation Army
- Local Food Bank
- University Foundation
- Hospital Auxiliary
TIP: Use the official legal name so your records match the charity’s records, or use the Search function on the Add Charity screen to find the legal name or EIN of the charity you donated to in the IRS database.
City
The city where the charity is located.
Examples:
- Denver
- New York
- San Francisco
- Austin
State
The state where the charity is located (MUST USE as abbreviation).
Examples:
- CO (Colorado)
- NY (New York)
- CA (California)
- TX (Texas)
How to Use the Charities List
Searching for a Charity
To find a specific charity quickly:
- Click in the Search box at the top
- Start typing the charity name
- The list filters to show matching charities
- Click on the charity name to see more details
Examples of searches:
- Type “Red” to find “American Red Cross”
- Type “Food” to find “Food Bank” or “Food for the Hungry”
- Type “Denver” to find charities in Denver
TIP: You don’t need the exact spelling—partial matches work!
Viewing Charity Details
The charities list shows:
- Charity name
- City and state
- How many donations you’ve made to this charity
- Edit button (pencil icon)
- Delete button (trash icon)
Click on any charity name to see more information about that organization.
Adding a New Charity
You can add a charity in two ways:
Method 1: From the Charities List (Click “Add”)
- On the Dashboard, find the Charities section
- Click the Add button
- The “Add a Charity” form opens
Method 2: While Adding a Donation
- Click Add a donation on the Dashboard
- Choose a donation type (Items, Money, Mileage, or Stock)
- In the form, look for the Charity name field
- Click “Add a charity” button next to the charity dropdown
- Fill in the charity information
The Charity Form – What to Fill In
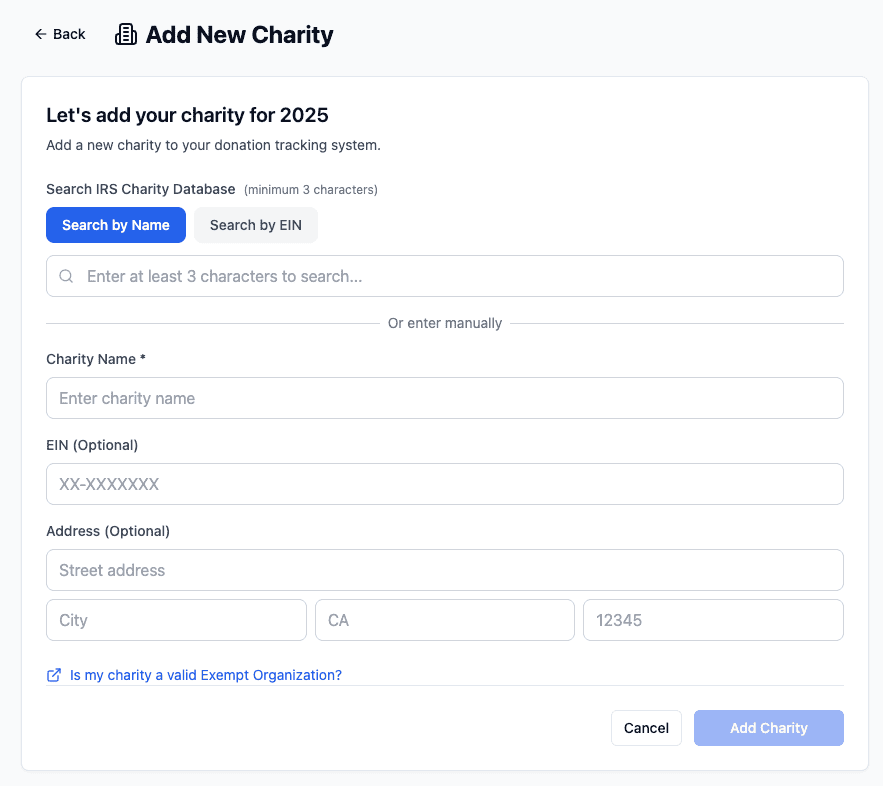
Charity Information
Charity name (required)
- The official name of the organization
- Use the exact name as the charity uses it
Address (optional but recommended)
- The street address of the charity
- Example: “123 Main Street” or “P.O. Box 456”
City (optional but recommended)
- The city where the charity is located
- Example: “Denver” or “New York”
State (optional but recommended)
- The state abbreviation
- Example: “CO” or “NY”
Zip Code (optional)
- The zip code for the charity
- Example: “80202”
Phone (optional)
- The charity’s phone number
- Example: “(303) 555-1234”
Website (optional)
- The charity’s website URL
- Example: “www.examplecharity.org”
Tax ID / EIN (optional)
- The charity’s Employer Identification Number (EIN)
- This is the IRS-assigned tax ID number
- Example: “12-3456789”
TIP: The more information you save, the easier it will be to verify the charity and document your donations later.
Saving Your Charity
- Fill in at least the charity name
- Click Save or Save Charity
- The charity is now added to your list
- You can use it immediately when adding donations
Editing Charity Information
If a charity’s information changes or you entered it incorrectly:
- Click View in the Charities section on the Dashboard
- Find the charity in the list
- Click the Edit button (pencil icon)
- Update any information
- Click Save Changes
The charity information is immediately updated everywhere it’s used.
Deleting a Charity
If you need to remove a charity from your list:
- Click View in the Charities section
- Find the charity you want to delete
- Click the Delete button (trash icon)
- Confirm you want to delete it
⚠️ WARNING: Before deleting a charity, understand:
- ALL DONATIONS MADE TO THAT CHARITY OVER THE YEARS WILL ALSO BE DELETED
- You can’t undo this operation, so MAKE SURE YOU’RE OK WITH THAT
- It’s usually safer to EDIT a charity’s information instead of deleting it
- If you delete by accident, you’ll need to re-enter the charity name AND DONATIONS when adding future donations
Recommendation: Only delete if you’re certain you’ll never donate to that charity again.
Finding Charity Tax IDs (EIN)
The Employer Identification Number (EIN) is important for tax records. Here’s how to find it:
Method 1: Ask the Charity
When you donate, ask the charity for their:
- EIN (Employer Identification Number)
- Tax ID
- IRS registration number
They should have this readily available.
Method 2: Check Your Donation Receipt
Most charitable donation receipts include the charity’s EIN.
Method 3: Search in Deductible Duck (PREFFERED)
- Click on the Add Charity button from anywhere
- At the top, search for the Charity by name (e.g. “Goodwill”). Partial matches work
- Find the matching charity by city/state in your returned list and click on it
- The Charity’s EIN will automatically be populated from the IRS Database!
Method 4: Use the Charity’s Website
Many charities list their EIN on their website, usually in:
- “About Us” section
- “Donate” page
- “Contact Us” page
Understanding Charity Types
What is a Qualified Charity?
For your donation to be tax-deductible, it must be to a qualified charity. These include:
Religious Organizations
- Churches
- Synagogues
- Mosques
- Temples
- Religious organizations
- Church-affiliated charities
Educational Organizations
- Public schools, colleges, universities
- School districts
- Educational nonprofits
- Student scholarship funds
Charitable Organizations
- Food banks
- Homeless shelters
- Community centers
- Disaster relief organizations
- Medical research foundations
- Youth organizations
- Environmental organizations
- Animal rescue organizations
Medical Organizations
- Hospitals
- Medical clinics
- Medical research nonprofits
- Public health organizations
Veterans Organizations
- American Legion
- Veterans of Foreign Wars (VFW)
- Other recognized veterans groups
Other Qualified Charities
- Qualified nonprofit organizations
- Government entities for public purposes
- Certain charitable trusts and foundations
What is NOT a Qualified Charity?
You CANNOT deduct donations to:
✗ Individuals (friends, family, people in need)
✗ Political campaigns or politicians
✗ Labor unions
✗ Homeowners associations
✗ Social clubs or fraternities
✗ Organizations that promote lobbying as a substantial part of their activities
✗ Bars, nightclubs, or entertainment venues
⚠️ IMPORTANT: Only donations to qualified charities are tax-deductible. If you’re unsure, ask the organization or check the IRS website.
Verifying a Charity’s Status
How to Check if a Charity is Qualified
Method 1: IRS Tax Exempt Search
- Visit The IRS TEOS Database Search
- Search for “Exempt Organization Search”
- Enter the charity name or EIN
- If it appears, it’s a qualified charity
Method 2: GuideStar (Now Part of Candid)
- Visit www.guidestar.org
- Search for the charity by name
- Review their nonprofit status and registration
Method 3: Charity Navigator
- Visit www.charitynavigator.org
- Search for the charity
- See if it’s listed as a qualified nonprofit
Method 4: Ask the Charity
Call or email the charity and ask:
- “Is your organization a qualified 501(c)(3) charity?”
- “What is your EIN?”
- “Can you provide written confirmation of your tax-exempt status?”
Tips for Managing Your Charity List
Tip 1: Keep Information Updated
If a charity moves or changes contact information, update it in Deductible Duck so your records stay current.
Tip 2: Be Consistent with Names
Use the exact same charity name every time. For example:
- Don’t switch between “Red Cross” and “American Red Cross”
- Don’t alternate between “Denver Food Bank” and “Food Bank of the Rockies”
- Pick one official name and stick with it
TIP: Use the charity’s official legal name if possible.
Tip 3: Store Tax IDs
When you have the charity’s EIN, save it in Deductible Duck. It’s helpful if you ever need to verify the charity or if the IRS asks questions.
Tip 4: Group Related Charities
If a charity operates under multiple names (main office and local chapter), you can:
- Keep both names on your list with clear labeling, OR
- Create one combined entry with the main location listed
Example:
- “Red Cross – National”
- “Red Cross – Denver Chapter”
Or just use: “American Red Cross (Denver, CO)”
Tip 5: Remove Charities You Don’t Use
After several years, you might accumulate charities you no longer support. Feel free to delete old charities to keep your list clean and manageable.
Common Questions About Charities
Q: Can I donate to a charity that’s not in my list?
A: Yes! You can:
- Add a new charity while entering the donation, OR
- Add the charity to your list first, then add the donation
Both work equally well.
Q: What if I don’t know the charity’s official name?
A: Use your best guess. You can edit it later if you find the correct name. The important thing is tracking the donation.
Q: Can I have the same charity listed twice?
A: You shouldn’t need to. If you have “Red Cross” and “American Red Cross,” consolidate them into one entry.
Q: What if a charity changes its name?
A: Edit the charity’s information in Deductible Duck to the new name. All your donations stay linked to that charity.
Q: How many charities can I save?
A: As many as you want! There’s no limit.
Q: Should I save charities I only donate to once?
A: It’s up to you. If you might donate to that charity again, save it. If it’s a one-time donation to a charity you’ll never contact again, it’s optional.
Using Your Charity List When Adding Donations
Once you’ve built your charity list, using it is simple:
- Click Add a donation
- Choose a donation type (Items, Money, Mileage, or Stock)
- Find the Charity field
- Click the dropdown arrow
- See your saved charities in the list
- Click the charity you want
- The name auto-fills
TIP: This saves you from typing the charity name every time. Just pick from your list!
Going Back
To return to the Dashboard, click Home in the left sidebar.
Summary
The Charities section:
- ✓ Stores your master list of organizations you support
- ✓ Makes adding donations faster (pick from a list)
- ✓ Helps you track giving patterns (see all donations to one charity)
- ✓ Stores important information (EIN, address, contact info)
- ✓ Allows you to search and filter easily
- ✓ Lets you edit or delete charities as needed
By taking time to build and maintain a good charity list, you’ll make your donation tracking much easier throughout the year.
Next Steps
Now that you understand the Charities section:
- Review your current charities – Click “View” and see what you have
- Add missing charities – Click “Add” for any charities you support
- Update information – Make sure names and addresses are current
- Save tax IDs – Add EINs for charities where you have them
- Start using the list – When you add donations, pick from your saved list