Welcome to the Dashboard of Deductible Duck! This is where you get a complete overview of your charitable donations for the year and manage your donation records. Think of it as your command center for tracking all your tax-deductible gifts.
What is the Dashboard?
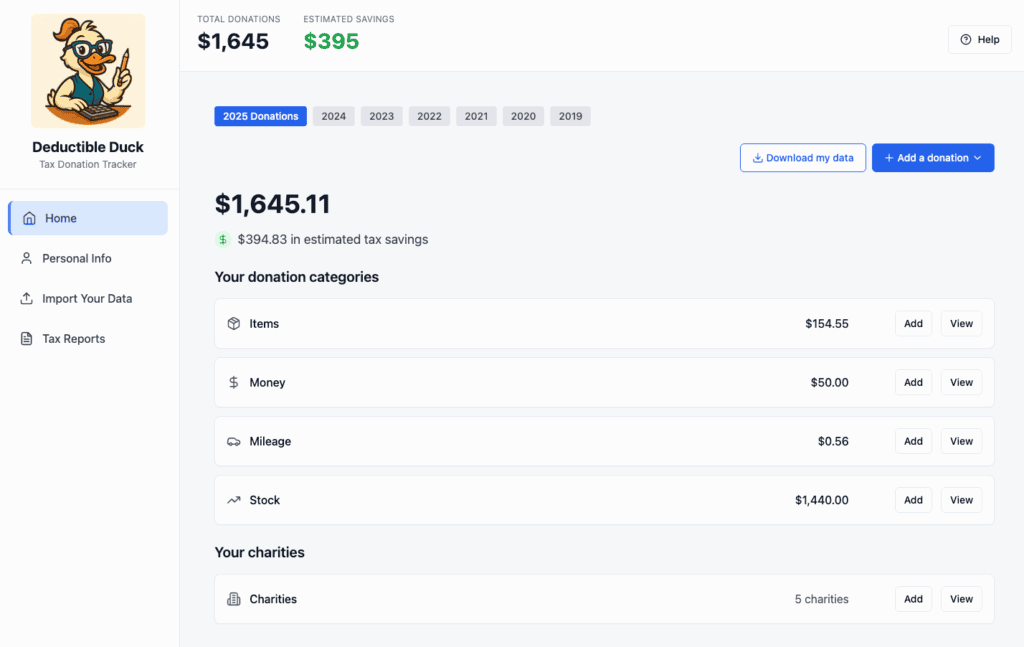
The Dashboard is the first screen you see after signing in. The Dashboard is your command center in Deductible Duck. From here you can:
- ✓ See your total donations and estimated tax savings
- ✓ Review donations by category
- ✓ Add new donations quickly
- ✓ Switch between tax years
- ✓ Access all other areas of the app
- ✓ Download your donation records
- ✓ View and manage your charities
Everything you need to track your charitable donations is accessible from this one central location. It shows:
- Your total donations for the selected year
- Estimated tax savings from those donations
- A breakdown of donations by category (Items, Money, Mileage, Stock)
- A list of all your charities
- Quick access buttons to add donations or view details
Understanding the Top Section
This area contains navigation links:
- Home – Takes you back to the Dashboard (you are here)
- Personal Info – Your tax information
- Import Your Data – Bring in donations from other tools
- Tax Reports – Generate export files or CPA reports for your supporting documentation
On the lower left, you’ll see:
- Your email address – Confirms who you’re logged in as
- Billing Status – Paid or Free
- Billing & Subscription – View your account status and payment info
- Sign Out – Safely log out when you’re done
On the top right, you can also access our help panel.
Understanding Your Donation Totals
TOTAL DONATIONS Box
This large number shows the sum of ALL donations you’ve entered for the selected tax year. This is the total amount you could claim on your tax return (subject to tax law limits).
Example: If you see $1,372.08, that means your donations total $1,372.08 for this year.
TIP: This number should match what you report on your tax return’s Schedule A (Itemized Deductions).
ESTIMATED SAVINGS Box (in green)
This shows approximately how much money you could save on taxes based on your donations and tax bracket.
Example: If you see $329, Deductible Duck estimates your donations could save you about $329 in taxes.
⚠️ WARNING: This is an ESTIMATE only. Your actual tax savings depend on:
- Your specific tax situation
- IRS tax law rules
- Whether you choose to itemize deductions
- Your final tax bracket
Always confirm with your tax professional or tax software before filing your return.
Selecting Your Tax Year
Just below the donation totals, you’ll see a row of year buttons:

(your buttons may look different as time goes on, the current tax year is always shown on the left)
Deductible Duck tracks the last 7 years of donations for you (including the current year, which is always on the left). Not all years may have donation information. If you didn’t import data or enter anything for that year, the donation amount will be zero.
How to Change Years
Click on any year button to switch to that year’s donations. The entire page updates immediately to show:
- That year’s total donations
- That year’s estimated savings
- All donations entered for that year
TIP: If you’re preparing your 2024 tax return in early 2025, select 2024 to review your 2024 donations.
TIP: You can track donations for multiple years. Click a different year anytime to view or update those donations.
The “Download my data” Button
Located at the top right, next to the year buttons.
What Does It Do?
Clicking Download my data creates a file containing all your donation information for the currently selected year.
When to Use It
Download your data when you want to:
- Make a backup copy for your records
- Share information with your tax preparer
- Import into your tax software
- Print a copy for your files
How to Use It
- Select the year you want (for example, 2024)
- Click the Download my data button
- File(s) will be saved to your computer (usually in your Downloads folder)
- These files can be saved for your records or used in your tax software (e.g. TurboTax)
For more details, see Download My Data.
⚠️ IMPORTANT: Always double-check that you’ve selected the correct year before downloading. You don’t want to send your 2023 donations to your 2024 tax preparer!
The “Add a donation” Button
Located at the top right in blue.
What Does It Do?
Clicking Add a donation opens a menu where you can choose what type of donation to add:
- Items – Clothes, household goods, electronics, etc.
- Money – Cash, check, credit card, or payroll donations
- Mileage – Driving for charity purposes
- Stock – Shares of stock or mutual funds
How to Use It
- Click the Add a donation button
- Select the donation type from the dropdown menu that appears
- A form opens where you can enter the details
- Fill in all required fields
- Click Save Changes at the bottom
The donation immediately appears in the appropriate category below.
For more information, see the section on the type of donation you want to add:
TIP: You can add donations one at a time, or come back multiple times to add more.
Your Donation Categories
This is the middle section showing four categories of donations.
What Are the Four Categories?
Each category represents a different TYPE of donation:
1. Items (Household Goods Icon)
Donations of physical objects like:
- Clothing
- Furniture
- Electronics
- Kitchen items
- Books
- Sports equipment
- Household appliances
Your total for Items: Shows the combined value of all item donations
Buttons:
- Add – Quickly add a new item donation
- View – See a list of all your item donations
2. Money (Dollar Sign Icon)
Cash donations made using:
- Cash
- Check
- Credit card
- Payroll deduction
- Bank transfer
Your total for Money: Shows the combined dollar amount of all cash donations
Buttons:
- Add – Quickly add a new money donation
- View – See a list of all your money donations
3. Mileage (Car Icon)
Distance driven for charity purposes, such as:
- Volunteer work
- Delivering donations
- Attending charity events
- Picking up donated items
Your total for Mileage: Shows the value based on IRS mileage rates
Buttons:
- Add – Quickly add a new mileage entry
- View – See a list of all your mileage donations
4. Stock (Chart Icon)
Donations of:
- Individual shares of stock
- Mutual fund shares
- Bonds
- Other securities
Your total for Stock: Shows the value of all stock donations
Buttons:
- Add – Quickly add a new stock donation
- View – See a list of all your stock donations
How to Work with Donation Categories
Quick Add (Using “Add” Button)
If you want to quickly add a donation to a specific category:
- Find that category on the Dashboard
- Click the Add button
- A form opens for that donation type only
- Fill in the details and save
This is faster than using the main “Add a donation” button if you know exactly which type you want to add.
View All Donations in a Category
To see every donation you’ve made in a category:
- Find that category
- Click the View button
- A new screen opens showing all donations in that category
- You can:
- Search for specific donations
- Edit any donation
- Delete any donation (if entered by mistake)
- Sort by date, charity, or amount
Your Charities
This section at the bottom tracks all the organizations where you donate.
What You’ll See
A box labeled Charities showing:
- Count – The number of different charities you’ve donated to (example: “8 charities”)
- Add button – Create a new charity record
- View button – See all your charities
Why Track Charities?
When you add a donation, Deductible Duck lets you select from your saved charities list. This means:
- You don’t have to type the charity name every time
- Charity names are consistent across your donations
- It’s easier to see all donations to one organization
How to Add a Charity
- Click the Add button in the Charities section
- Enter the charity’s name (required)
- Enter the address (optional but helpful)
- Click Save
The charity is now available when you add donations.
How to View Your Charities
- Click the View button
- A screen opens showing all your charities
- You can see details like:
- Charity name
- Address
- City and state
- How many donations you’ve made to each
- You can edit or delete charities if needed
For more information about adding, deleting, or editing charities, see the Charities section.
⚠️ WARNING: If you delete a charity, be careful about donations already linked to it. It’s usually safer to edit a charity’s information rather than delete it.
The Bottom Navigation
Left Sidebar Links (Always Visible)
On the far left, you’ll always see:
- Home (currently selected – highlighted in light blue)
- Personal Info – Update your name and tax information
- Import Your Data – Bring in donations from other tracking tools
- Billing & Subscription – Manage your subscription
- Sign Out – Log out of your account
Footer Links (Bottom of Page)
At the very bottom, you’ll see:
- Privacy Policy – How we use your information
- Terms of Service – The rules for using Deductible Duck
- Copyright notice – © 2025 Deductible Duck. All rights reserved.
Quick Tips for Using the Dashboard
Tip 1: Keep Your Year Organized
If you’re preparing taxes for multiple years, work on one year at a time. Switch years using the buttons at the top.
Tip 2: Review Before Filing
Before you file your tax return:
- Click View on each category
- Verify all donations are correct
- Check for any donations in the wrong year
- Make corrections as needed
Tip 3: Update Personal Info First
Before adding donations, click Personal Info and make sure your tax information is current. This ensures your estimated savings are accurate.
Tip 4: Download for Your Records
At the end of the year, download your complete donation data. Keep it with your tax records.
Tip 5: Print for Your Tax Preparer
If you use a tax preparer, download your data, open it in a spreadsheet, and print it to share with them. They may want to verify your information.
Common Tasks
Task: Add a Donation
- Click Add a donation button (top right)
- Choose donation type from the menu
- Fill in the form
- Click Save Changes
Task: View All Items I Donated
- Find Items category on Dashboard
- Click View
- Review the list of all item donations
Task: Change a Donation
- Click View in the appropriate category
- Find the donation in the list
- Click the Edit button (pencil icon)
- Change the information
- Click Save Changes
Task: Delete a Mistake
- Click View in the appropriate category
- Find the incorrect donation
- Click the Delete button (trash icon)
- Confirm you want to delete it
Task: See My Total for a Category
- Look at the Dashboard
- Find the category you’re interested in
- The dollar amount is shown to the right of the category name
Task: Download All My Data for This Year
- Make sure you’re on the correct year (click the year button at top)
- Click Download my data button
- Open the downloaded file in a spreadsheet program
- Print or save as needed
Important Reminders
⚠️ Fair Market Value
For items you donate, you must claim the “fair market value” – what a willing buyer would pay for the item in its current condition. Deductible Duck helps estimate this, but you are responsible for the accuracy. See IRS Publication 561 for all the details.
⚠️ Keep Records
Keep receipts, charity letters, and documentation for all your donations. The IRS may ask to see them.
⚠️ Qualified Charities Only
Only donations to IRS-qualified charities are tax-deductible. Ask the organization or check the IRS website.
⚠️ Donation Limits
There are IRS limits on how much you can deduct for charitable donations. These limits depend on your income and type of charity. Consult your tax professional.
⚠️ Estimated vs. Actual
The estimated savings shown in Deductible Duck are estimates. Your actual tax savings depend on your final tax situation. Don’t rely on these estimates for financial planning – they’re guides only.
Getting Help
If You Have Questions
- Click the Help button (question mark icon, top right)
- Browse the list of frequently asked questions
- Click any topic to see detailed answers
- You’ll find help on topics like:
- How to use each screen
- What qualifies as a donation
- How to value donations
- What records you need
If You Have Technical Problems
Click Help and look for contact options to report problems to the Deductible Duck support team.
Next Steps
Now that you understand the Dashboard, you might want to:
- Update Your Personal Info – Make sure your tax details are correct
- Add Your First Donation – Click “Add a donation” to get started
- View Your Charities – Click “View” in the Charities section
- Download a Sample – Click “Download my data” to see what your data looks like